Black Soldier Fly Hydroponics
I've submitted BSF Hydro as a participant in the "Deep Space Food Challenge" put on by NASA and CSA - you can see my progress and ideas here.
Please note, while I mention University of Hawaii at Hilo in several places, 0% of this technology/system was created in partnership with UH or while I attended UH. I had this entire system functional long before I ever went to UH, however I did present this system at a UH agricultural competition, and they were interested enough in this system to have me build a complete system on their Hilo campus.
 Overview:
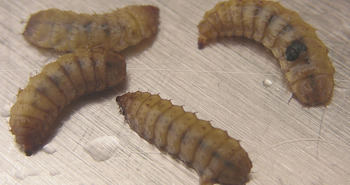
A family sized food growing system utilizing only food waste to then produce fresh vegetables. Through very fast composting via black soldier fly (BSF) larva (similar to vermiculture quality composting), an individual or families generated food waste is quickly recycled into high quality hydroponic nutrient base to grow all of their own vegetables. Optional: Piggybacking this technology, earthworms can living in the hydroponic trays with the plant roots, and guppies can live in the compost tea, along with the beneficial bacteria. The system can be off-grid, using a solar panel (no batteries) to run a ebb/flow cycle during the daytime hours (no batteries). In the ebb/draining time, an aerator turns on and provides oxygenation for the beneficial bacteria and guppies in the compost tea tank. (Click the image for a 1.4mb PDF overview of how the system works.) The time schedule may be 15 minutes fill time and 45 minutes drain time if you live in a humid moderate temperature climate (Hawaii), while it might be 15 minutes fill time, and 15 minutes drain time in hotter/drier climates (Arizona).
System Output:
I am regularly growing and harvesting:
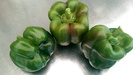
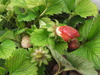
Tomatoes, cucumbers, carrots, beets, lettuce, arugula, green beans, peas, strawberries, onions, zucchini, bell peppers, celery, various herbs, and others. I tend to grow only fast producing plants, and not things like broccoli or asparagus which take over a year to produce- that's valuable real estate that can be producing edible food long before they do. I also have done okra before, but the quantity of fruit it produces to the size of the plant is not so great, so I evicted the okra.
Please note that while your grow trays may be only 3'x3' or 4'x4' each, you can PACK the trays with plants. You can entirely disregard any traditional spacing requirements since the nutrients come to the plants, there is no competition for those nutrients. The main thing is to plan your trays with the tallest plants on the north side of the trays (better yet, a lattice for climbing plants on the north side), so that they don't shade any smaller ones.
Nutrient Sources:
Food waste only. Which consists of any edible foods, including meats. Any waste like chicken parts are encouraged. The more diverse the food waste, the more complete the nutrient base. No bulking materials should be added (no grass, leaves, paper, etc). No woody parts like grape stems, or they will remain as the larvae will not process them. Egg shells are needed before you add food as part of the drainage system, but continually adding them after that, they are not processed and add to some bulk material which will eventually build up to be removed from the bins and is excellent around trees or a soil garden. Normal amounts of food waste from preparing meals is all that is required since the system recirculates the nutrients until they are used by a plant (none lost as with dirt farming). If you eat out most of your meals, and don't have food waste, this is a problem. Feel free to collect additional waste from work or neighbors.
You will NEVER use traditional hydroponics chemicals EVER. This is a complete ecosystem, and chemicals/fertilizers would be detrimental to the beneficial bacteria, guppies, earth worms, etc. and are unnecessary.
Ongoing Maintenance:
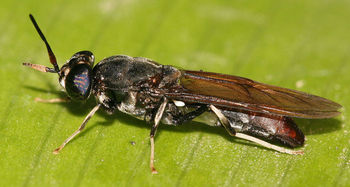
- Daily to once per week add your food waste to the BSF bin. The larva will go semi-dormant for longer periods (2-3 weeks), but at some point they will either go ahead and pupate into flies, or die off. Be nice to your larva, feed them.
- Once every two weeks, rinse the BSF bin, which rinses nutrients off the egg shells and into to the hydroponics (This assumes you use compost bins with screen bottoms, mounted directly over the water trough)
- Add seeds as you harvest for plants like carrots.
- Top off the hydroponics system with water usually every week. My 29 sqft system uses about 5 gallons per week in a humid environment. Your reservoir should hold at least 2x the amount your trays do, which gives you a buffer from evaporative water loss, and so longer times between when you have to add water (see other notes on this page about water quality). The system is extremely frugal when it comes to water use compared to the quantity of food you will harvest.
Once constructed, ongoing maintenance is extremely limited. Simply add food waste as available (I do so about every 4-5 days), add vegetable seeds where desired (most seeds germinate fine directly), and harvest as appropriate. Depending on the environment and the size of the system, some water will need to be added every each week. In my design, a rain gutter terminating at a 5 gallon bucket keeps water handy as needed. The food compost/BSF bins over the water tank with screen bottoms allow for nutrient release as the BSF make it available (and for later rinsing).
The system is designed to be a "life long" system as much as possible, particularly when redwood is used in locations with termites. The clear agricultural sheet roofing is rated at 5-7 years life, and is the only ongoing expected repair. This sheet roofing is used on a system in Colorado currently and easily supports 18" of snow. You could use more substantial clear roofing panels, but this would require additional roofing structure, and may limit the sunlight/UV that the plants need or want.
Design & Construction:
I've built this system three times now, the first was at my home in Hawaii (3 - 36" trays), one on the Univ. of Hawaii @ Hilo campus (3 - 48" trays), and one in Colorado (3 - 36" trays).
I used redwood on the Hawaii system due to significant rot & termite issues, so this increases the price of the unit as designed. The price using typical white/construction lumber for my design using three 3x3 trays is about $1,000. Using redwood, about $1,400. The unit I built on the University of Hawaii campus is three 4x4 trays (48 sqft w/ 3-4x4 vs. 29 sqft with 3-3x3) in redwood is $2,500. Most likely these prices will be lower outside of Hawaii since things just cost more there (shipped in). With my design you can also use zip-on walls with reversible black/white so that even in winter in some areas, the system is still productive year round. In more severe winter areas, you could have a BSF composting system setup in the garage (with some heat in winter) to continue to process food waste, for immediate start up in spring. Using the zip-on walls in this case allows for a much longer growing season.
For my design, it takes 3 full days for one construction talented person to build assuming you have all materials on hand. Here is the wiring diagram of the solar panels, regulator, timer, pump & aerator. You can also just use a waterfall pump and aerator designed to plug into the wall (on a simple timer with 15 minute increments).
When first establishing a system, you will need likely several weeks to several months worth of BSF food processing to create the initial level of nutrients to begin using your system (before planting). You can start your BSF processing and composting before you build a system. If you live in a particularly cold climate, or high altitude, this is especially a good idea to handle any BSF challenges before investing in a full system. (see the section on my desired future research)
It absolutely is possible to build a less interesting (less expensive) frame/cover and be successful since the important factors are using the BSF compost with a hydroponics system.
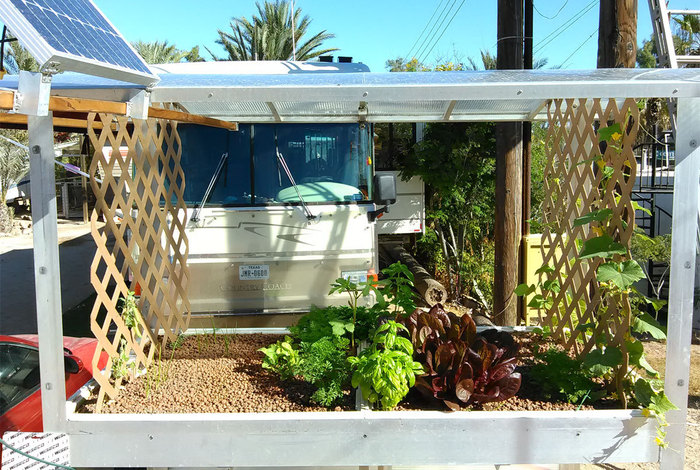
Ecoasis in AZ
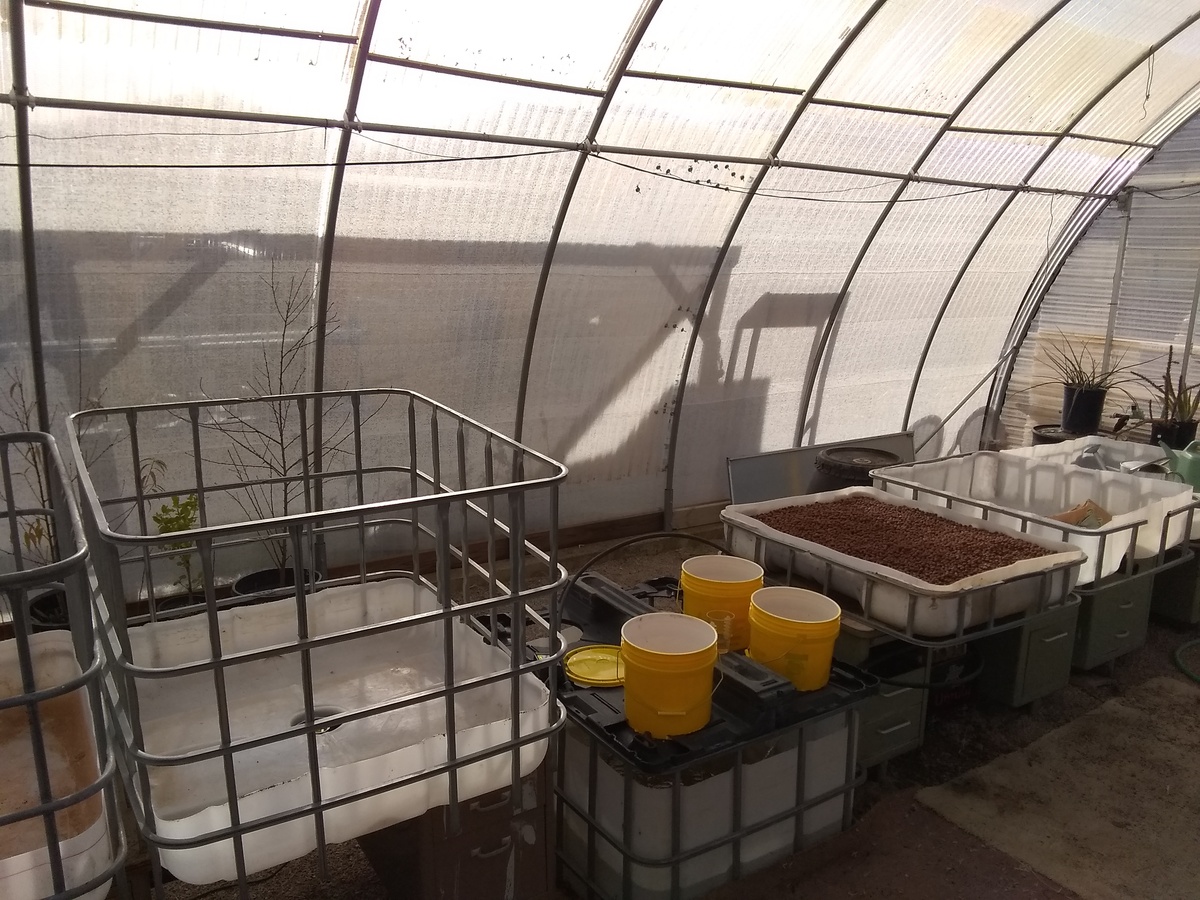 This system came together after literally a friend of a friend who heard about BSF Hydro, contacted me about assisting a local nonprofit - Ecoasis, with their greenhouse. They had purchased a partial hydroponics system, with the intention of setting up a aquaponics system - using fish as the primary source of nutrients. Aquaponics has allot of issues, the main one being that the fish provide almost exclusively nitrates for the plants, and nothing else. Which means you can grow lettuce very well, but no other plants will thrive. I did suggest that we start off with the system fully laid out, and only fill one tray with growing medium since that is the most costly part of the project. This will allow them to get started, build up the nutrient water quickly (vs. enough for 6 trays immediately), and basically have their own proof of concept. The only remaining items to complete all trays is to install the ebb/flow towers, plumb them together on each side, add 2 new larger pond pumps (1,100 gal/hr), and pour in the growing medium.
They basically had acquired grow trays and a water trough constructed from one of these liquid shipping cubes you have probably seen before. They had a total of 4 cubes and frames, which will create up to 8 trays, or 7 trays and one water trough. They are roughly 42"x38". The previous owner had cut off the top and bottom to use as the trays, which during setup proved to be a problem. Ideally, they would have cut off the sides to make the trays (they would be the same size as the top/bottom), however with no screw on top or bottom drain. We had problems with both the screw in tops and the bottom valves, so try to cut off the sides instead, which also ends up leaving a flat tray bottom vs. if you use the top/bottom. If you use one for the trough, still cut the side off for a tray, then the screw in top and bottom valve will be on the side. Seal BOTH with an adhesive sealant (all screw in top gaskets were cracked and would have leaked). Using these cubes, you could have 1 tray and trough from one cube, 3 trays and one trough from 2 cubes, etc. I think though the limit is likely 3 trays per trough, since you need at least enough water to fill those 3 trays at least 2x. In their case, and for the sheer quantity of food they will process, we did one trough, with 6 trays. We will alternate their cycle- using 2 pumps, run the left side for 15 minutes (flow), with 15 minutes off (ebb), then the right side will do the opposite time- running when the other side is in the ebb time. We could have used one pump and some electrical valves, but that would have been both complicated and more costly.
We were also able to use the frames and even the bottom skid (where the fork lift picks them up) in our design. The short part of the frames was great to just set around the trays to support the sides. When full of water and grow medium, the long sides might bow out some otherwise. But if you build a bottom support frame, you might just build in sides for them and not use those short frame sides (see pics). With the taller remaining cube frame, we just stood those up around the trays as they can act as short lattice for the plants. We considered cutting them up to make them just across the back, but since we supported the cubes on salvage office desks, there was no good way to really attach those. If you did build a wooden support/frame, then cutting up those cubes into 2 "L" pieces and securing them on the north side of the trays would make some decent heavy duty lattice for your vining plants or tomato supports. In addition, one of the cubes had a black plastic skid, which we were able to repurpose into the top over the water trough, to hold six 5 gallon pails, which we converted into BSF larva/food bins (see pics). So, if you have a choice to get a cube with the plastic bottom skid and want to duplicate that design, opt for the plastic bottom one vs. the steel ones.

Shipping Cube |

bucket bottom |

buckets |

bucket ready for assembly |

bucket bottom parts |
completed |
Click here to Subscribe (or unsub) to get infrequent BSF Hydro updates sent to you via email.
Pictures
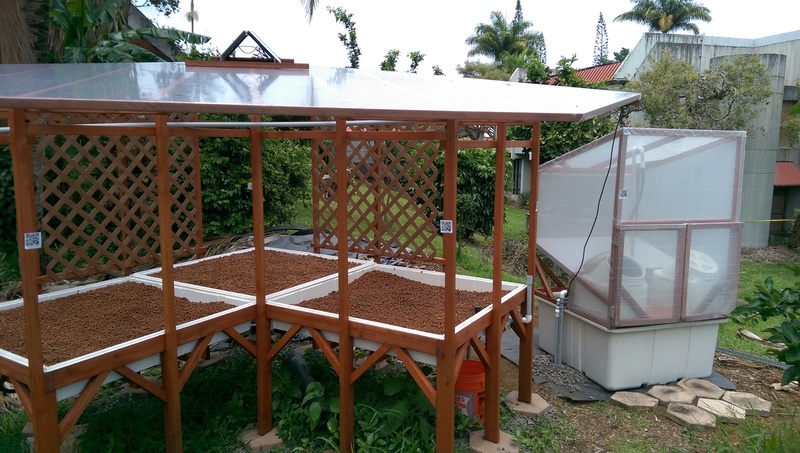
Below the system I built in Hawaii with three 3'x3' trays - withstood a category one hurricane with no damage what so ever.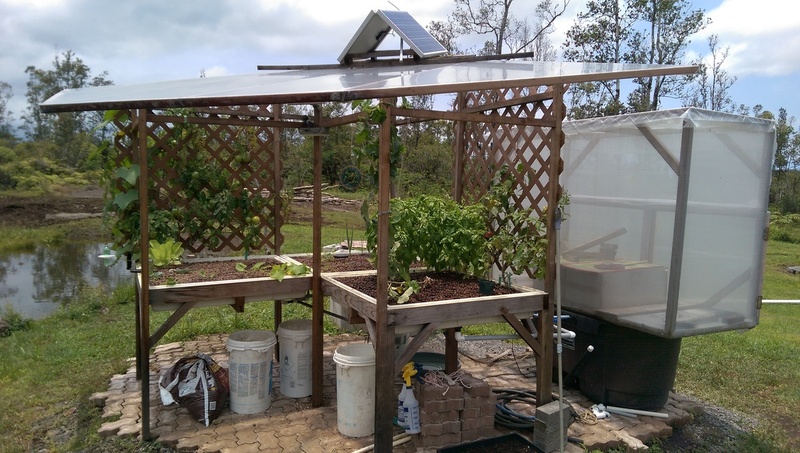
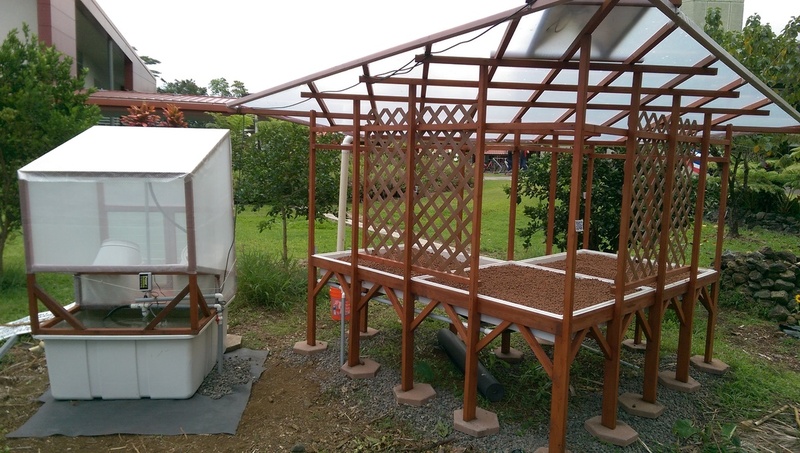
Below is the University of Hawaii system with three 4'x4' trays
Here is my AG 230 class project paper on this system.
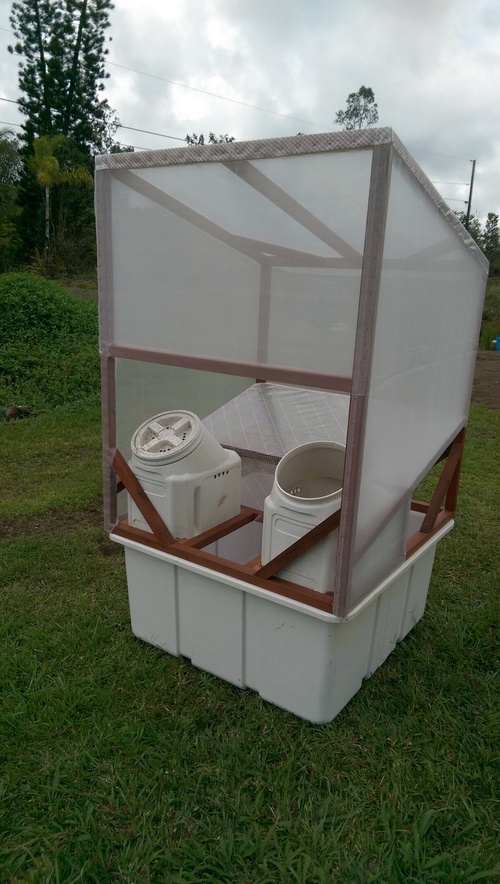
Below is a close up of the University of Hawaii system BSF captive compost bins mounted over the 150 gallon reservoir. There are doors to close the front not shown here.
I am currently (2016-current) living & traveling in a 36' motorhome, and traveling the US & Mexico, and so I build a BSFHydro system on my tow car trailer. I did finally give up on the trailer based garden, as the nutrient water tank under the trailer repeatedly would break open.
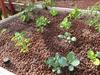
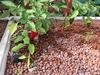
Below is a pic of my garden 9 weeks after starting from seeds.
The most important factor on the BSF bins is capture of the liquids created while the BSF are processing your food waste, and then to rinse the finished compost materials with the water from the reservoir (every week or two) so that the nutrients end up in the nutrient water in the reservoir. I've found it best to use stainless steel window screen for the bottom (100% coverage), then it's very important to used crumbled up egg shells (1.5" deep right on the screen). Without the egg shells, the screen WILL plug up, causing an anaerobic condition (no oxygen, build up of liquids), then it will stink - and it should NEVER stink (see section below about stinky compost issues).
A few notes:
- Your reservoir pump will need a screen on it (window screen size holes) to avoid clogging up with debris, and to avoid pumping your guppies or small fish into the system. I generally make a 12" long screen tube with one end closed, attached to the pump, which ensures it will never plug up. Don't suck water from the floor of the reservoir - you will get some organic sludge, etc. on the bottom, so suck water from at least a few inches up (plan accordingly in your tank size). You can occasionally scoop out this organic sludge - liquid gold, and put it on your ground based plants and trees.
- I've found that crunched (not powdered) eggshells in the bins acts as a filler which greatly helps the nutrient drainage. If you have only food waste, the bottom may still plug up too easily, and the egg shells really help prevent this. I've also used papaya seeds (lots) for this purpose.
- If you add meat/animal parts to your bins, then avoid rinsing the compost into the reservoir unless these items are fully processed by the BSF. If you don't overfeed the larva, then they will have eaten everything within 1-2 days. So rinse just before you feed them more food.
- Since this is mesophilic compost (70-100 degrees), the un-eaten solids that you remove from the system with seeds are likely to germinate still (and items like avocado seeds, bones, etc) , so if you have a traditional thermophilic compost pile (100 degrees+), then it may be good to add there so that the seeds are destroyed (composted).
The suggested BSF bin:
- Bins with screen bottom, mounted directly over the reservoir so you rarely will need to handle the compost
- Have a lid for the container so that the larva won't go "walk-about" - usually if you have a lid that seals around the lip, then drill a several inches diameter hole in that lid for the flies to come and go.
- The liquids automatically drip through the bottom screen into the reservoir.
- You will need a hose from the pump with a valve on it, so that you can rinse the bin every week or two (while the pump is running). The liquids will return through the bottom screen to the reservoir taking the nutrients and small particles with it. Depending on what food you have added to your system, you may have almost nothing left in the bin when finished rinsing (other than larva and the crushed egg shells). If you have remaining stuff like fruit seeds, bones, etc, then eventually you will need to scoop these out and can use it as compost elsewhere.
- When you rinse this bin, the BSF will not drown and you don't need to do anything with them.
- If your screen is plugged up with particles, and the bin fills up with water while rinsing, stir well while full, then just leave it full, it will drain. Check the later or the next day, and turn over the compost, getting down to the screen bottom. But be sure you do not puncture your screen bottom! Then rinse again, up to 4 times (once or more each day), until it looks like the small particles are all gone.
- For the more dry climates - the BSF bin may dry out too much unless you are processing LOTS of food waste. In this case I suggest you tap into the main pump output tube with a ice maker supply line (1/4" tubing), then place the end into your BSF bin. This way when the pump is on, a small jet of water is sprayed into the bin, adding moisture.
- Crazy Hot- so, what to do when your environment is consistently near/over 100 degrees? This likely can cause some issues where the water reservoir will eventually become the same temp as the ambient temp - so if your system is in a green house, and it's consistently 100 degrees (37.7 C), there may be issues both with your larva and growing plants.
- First, be sure your larva bins are shaded - don't add extra heat to them by the sun heating up their bins (besides, the larva hate the sun light).
- One things I've done in my traveling system is empty my automatic ice maker bin into the tank daily. So, if you have freezer space, you might fill up a bucket or multiple containers with water, then each day drop them in the reservoir.
- If in a green house, and it has walls, consider removing the end walls since NO fan will ever be able to remove enough heat.
- One idea I've had (not tried) is if possible, bury (like 2' deep) a big roll of the landscape type black tubing (larger diameter than your pump uses) in a big coil with at least 12" between bands. Then when in the hot season, have your pump routed through the coil, which will cool the water. Similarly, in the winter in colder areas, this could be used to warm the water. You would need a larger volume pump if you do this since 100' of tubing causes some friction (using the larger diameter tube helps).
- Along those same lines, you could just try burying your water tank to 1/2 it's height or more (I doubt burying any less will matter). And as well, this may help for colder climates.
- Crazy Cold- what what to do when winter comes
- If you have a green house with a exhaust fan - turn it off. It can get up to 120 degrees in the green house, and that is OK when it drops in temp overnight. Ideally, you want no lower that 50 degrees at night.
- See the second to last and last item above in the too hot section.
- I use a ceramic reptile heater with a thermostat control, so I stick the sensor into the BSF compost where they are active, that way the heater does not come on unless they are not creating enough heat themselves. You could use a filament type 100 watt light bulb, but the larva don't like light, so that would be sort of punishing them. Adding a heater in this way will at least get them through cold nights. The larva will die if they actually get to 50 or below (or in that range). As well, if they are cold, they are going to go dormant (stop eating), which gets you nowhere.
Problems & Solutions
Common problems with compost:- STINKY compost- means that it's gone anaerobic (no oxygen) and has "bad" bacteria. The compost should almost always smell earthy, and never stinky. If it is very wet, then you don't have enough drainage (did you add 1.5" of crushed egg shells first?). Or if your compost is very deep (more than 4") it may compact and not get enough air to the bottom. If you add a bunch of anaerobic compost to the reservoir, you may kill any fish if you have added them.
- Solution
- If you did not add the egg shells, go directly to jail, do not pass GO. Remove all the compost, rinse the bottom screen, add 1.5" of crushed egg shells (that's allot of eggs), then put the compost back AND do the following items also.
- If stinky like sewage, you need to turn over the compost in the bin well each day to add oxygen and be sure that it can drain until it's no longer stinky.
- If stinky like rotting food, it is possible to overload your BSF with food, so build up your colony slowly, and only provide enough food that they can process it in 2 days.
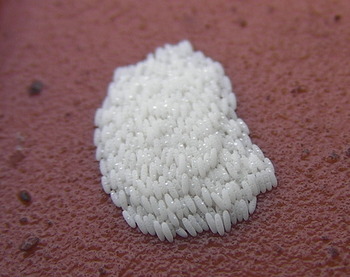
- No BSF eggs or eggs not hatching (egg clutch remains for more than a week) - The eggs will usually hatch in 2-5 days, and if they do not, then there is maybe a problem.
- Solutions
- No enough moisture - be sure to use a lid on your BSF compost bin to hold in moisture, but still allows BSF flies to come and go. Some research has indicated 85% humidity is ideal. Also see notes above about adding a water line to the bins.
- Not warm enough - The eggs like to be around 80 degrees F to hatch. Cooler evenings are OK, but if the eggs aren't able to warm up, they won't hatch.
- It is possible they just weren't fertilized. So if most of the egg clutches are hatching, don't worry about a few that don't.
Research on Black Soldier Flies
These are all copyrighted by their owners, and are not for commercial use.
Reduction of Escherichia coli O157:H7 and Salmonella enterica Serovar Enteritidis in Chicken Manure by Larvae of the Black Soldier Fly
A Survey of Bacterial Diversity From Successive Life Stages of Black Soldier Fly (Diptera: Stratiomyidae) by Using 16S rDNA Pyrosequencing
Black Soldier Fly (Diptera: Stratiomyidae) Larvae Reduce Escherichia coli in Dairy Manure
Rearing Methods for the Black Soldier Fly (Diptera: Stratiomyidae)
Some general tips on using the system: (to be organized and categorized as this list is developed)- In the trays, don't grow plants with lots of roots near the fill/drain ebb/flow fitting (the short one on the bottom). Roots will eventually grow into it and plug it up. I usually plant things like carrots, beets and onions around the inlet side. And so I put really "rooty" plants around my overflow tower where they cannot cause any issues. I also have made some surrounds from thin wall 3" diameter PVC (schedule 20). These allow me to see the roots growing into the drains, then easily just pull them out by hand. I used a circular saw to cut the slots in the pipe for maximum/easy water flow while easily keeping out the growing medium (if you use the expanded clay type).
- When you harvest, try to remove all the roots you can. Leaving behind root is not helping and will eventually lead to plugging up of the hyDroton with organic matter (basically dirt). I will usually uproot the entire plant, then gently shake out some of the hyDrotron (so as to not loose them outside the trays), then clip off the top of the plant, and leave the roots lying on top of the hyDroton for a few days so that the earthworms will migrate out of them back into the trays. After this, work the roots well with your hands to remove all the hyDroton. I usually then rinse the roots in the nutrient solution before discarding since they are usually well coated with dried solution. BSF will not eat plant roots, so don't put them in the BSF bin.
- Start vining plants either against the tray wall by the lattice, or against the wall by a vertical roof support. Tie up the plants to either as they are growing.
- Do not use water hose water (city water) to refill the system. If you do need to use city water, you will need some aquarium dechlorinator since most cities now use chloramines - which will NOT evaporate if you just let it air out like chlorine gas would.Ideally, you would use rain water, well water, etc. If you do use well water, make sure there is not a chlorination system on it, and that it does not have high concentrations of minerals. This is because as the water evaporates, it will leave behind the minerals, which will eventually build up. So if you have high sulphur well water, eventually it will poison your system. I personally use city water with the dechlorinator in it, or reverse osmosis water (use the reject water from RO to water your dirt bound plants/trees).
- Most seeds will start just fine directly in the trays, but try not to place them very deep, like no more than two hyDroton pebbles deep, but enough so they will be wet when the tray fills. Once sprouted, most are easy to transplant and divide to disperse better. Wait until they are big enough that you don't damage them, but small enough that they don't have significant roots yet. When you do transplant, while the tray is full of water, bring your hand in from the side, and come up from underneath, allowing the hyDroton to roll away.
- Don't plant things like carrots and beets right in a dense root area like near the base of a established tomato plant. The dense roots will hang onto the hyDroton pebbles, and prevent carrots and beets from being able to easily move them as they get bigger.
- Do not put raw eggs in your system. I'm not sure why, but it killed all the guppies when I did this. The amount of raw egg on egg shells is OK. Note however that it is *important* to use egg shells in the bottom before adding any food (like 1.5" deep) since they facilitate drainage of the liquidized food, and prevent the bottom screen from plugging up.
- BSF systems have generally be developed to harvest the larva for fish or chicken feed, and you can still do this in the BSF Hydro type system, just be sure that you are seeing enough egg clutches and hatching to support your desired food processing colony size.
- The earthworms are optional. I grew everything fine before introducing earthworms, and after introducing them my seeds seem less likely to germinate in the trays. Dr. N. Arancon at the University of Hawaii has research that shows that earthworms can harvest and relocate seeds, but I'm not sure if this is the case here. I definitely had no problems starting seeds directly before the earthworms, but that is correlation not causation. You can of course start your seeds elsewhere, and then transplant them into the trays. I have not experienced any shock or seedling death as long as careful to inflict the least damage possible when transplanting.
- I have experienced occasional drops in nitrogen levels by watching the intensity of the green color in the cucumber leaves. When this occurs, I've simply added about 2 cups of composted chicken manure (which is very high in nitrates) directly to the nutrient water 100 gallon reservoir. This has not caused any issue with the guppies. I also have found rhizobia on the roots of plants in the system (a symbiotic bacteria that creates root nodules that provides plants with nitrogen). Also, if you have any fresh fish or fish cleaning waste (heads, remaining fillet bodies, etc), the larva love these things and they also will help kick up the nitrate level.
Consulting
I am available for a minimal cost if you want me to design a system for you. In some situations, I might be available to lead the construction of your system. Just [ email me ] and give me some details on your project, and I'll get back to you. If you are having problems with your system, I can usually help remote troubleshoot at no cost.
My Desired Future Research- Simplified timer - DONE. I've located a timer available on ebay for about $8. I generally coat the entire circuit card in silicone or e-6000 to make it weatherproof.
- Cold weather BSF life cycle system - I've built a system at 9,000 ft above sea level in Colorado, and was able to get BSF to pupate into flies. I was unsuccessful in mating and egg laying in what was a brief test in a non-captive environment, and it was not likely ever 80 degrees. I would need to build a enclosed, insulated BSF hatchery which could be kept in a garage or similar space, and use some heat source and artificial light. Ideally this system will incorporate bins mounted over water, with a switched pump for rinsing as needed over the winter. Once it warms up enough inside the hydroponics enclosure, this nutrient concentrated water would be added to the system, as well regularly during the growing season.
- With and with-out earthworms - I like the earthworms in the system, but since the seeds sprouted significantly better in my system before the earthworms, I'd like to make a determination if the two are related, and if so, how they are related.
- How small can it get - I'd like to work on a apartment patio sized system (likely south facing only) and see how well it could work. With only an individuals food waste, I was able to have 27 square feet of growing space filled and producing, perhaps there could be 2 levels of trays along the railing with less sqft, but more concentrating growing...
- Restaurant - I'd like to work with a restaurant who likely already uses a garden for some of their stocks, and solve both a waste disposal problem, and provide fresh vegetables and herbs at the same time. If they already use soil farming, this would also be a incredibly significant labor savings.
- Indoor system - likely this would be similar to the cold weather system, where the BSF bins are in a alternate location, with the trays located indoors along south facing windows. The solution doesn't really have an odor to it, so I think this is a viable situation.
- Top of high rise housing building. Residents could recycle their food on the roof.
- ... and others, but this is the big ticket items I'd like to work on.
Commercially available BSF bins
So far, all the commercially available BSF bins focus on harvesting the larva for feed stock (to feed chickens, fish, etc). Every design I've seen likely is going to go routinely anaerobic (and stinky), and since they are sold as single units, are surely fraught with problems. I've seen many using different materials in the bottom of the bins, to facilitate draining of liquids, but all have issues. I myself tried coconut matting, which worked well for drainage, but became compacted with larva which eventually died in place. Basically, the commercial BSF systems I've seen will cause more problems than the benefit of their purpose. However, I have not used any of the commercially available bins myself, and this is based on my experience with various methods I tried, and my best guesstimate of how the commercial bins work based on exterior photos. The screen bottom as I propose and have used works well (combined with the crushed egg shell), and appears to be a good hole size for the processed particles to pass without much clogging. The clogging I did get cleared up when filled with water, eventually self clearing.
Captive vs. Non-captive Flies
I suggest a captive system where the bins are contained in a screen enclosure so that the flies (or larva) are unable to escape (or inside an enclosed greenhouse). I've had geckos, lizards, frogs and birds all simultaneously having their way with my BSF larva and flies in a non-captive scenario, creating a problem for reproduction. As well high winds may blow flies too far for them to return to mate and lay eggs. If you build a captive system, make sure you create enough space for them to fly around.
Getting your BSF bins started
When you first start, you will likely order or get a limited number of BSF larva from someone (&/or order off eBay). The trick is to not overwhelm your initial limited number of larva with food waste (although if you order say 5,000 newborn/small larva, they will eat allot of food). You will need to feed them in smaller amounts, just enough that they can consume in a day or two. Avoid meat while getting the colony started since it may go off-bad before they have a chance to process it all. I'd suggest starting with a batch of around 5,000 larva. This is around 2 measured cups of small/baby larva. As well, if you have an option to also have older (larger) larva, this may help since they will of course turn to flies and lay eggs much sooner. The reason being that the larva live so long as larva eating, that if you start only with very young larva, it may be 4-6 months before they mature, pupate into flies, and then lay eggs. What you want is batches of eggs as soon as possible, so that you can build the colony quickly and then process all your food waste without any issues. During this time, if you live in a colder environment, you will also need to make sure that the bins don't get too cold at night (guessing no lower than 50 degrees). Once the colony is established, they actually maintain their temperature in the bin to some degree. As well, once you have been processing food for a while, some non-processed organics in the bins may act as insulation. Note that they won't lay eggs unless it gets to at least 80 degrees during the day (also won't hatch), so colder environments may need a heater in their system to ensure this happens.
Getting your growing trays started
When you first start, you will need to allow your nutrient water to get established. This really depends on how much water you have in your reservoir, and how many trays you are using. Basically when you start, there will be no nutrients in the water, so you need to allow time for the BSF larva to process food to get that water to a nutrient level to sustain the plants. Generally, I'd say this is 2 weeks minimum if you are processing lots of food waste compared to your system size.
Other Considerations -
My adventures using this system on my car trailer, and traveling all the time with it (very often every 2 weeks driving for 6+ hours) has led to some great experiences & challenges - related to just being mobile, and some that relate to doing the garden system in different environmental conditions.
Just place your mouse pointer over a thumbnail to view the image larger.